概述
OkHttp个人理解
简介
OkHttp做为一种很牛逼的网络框架,目前使用的人数越来越多,在github上面项目的start数也达到了28k的存在,可谓是一种很牛逼的网络框架,所以做为一个小菜鸡的我,就有必要的去学习
下人家的牛逼所在,下面分几个点来分析
1.OkHttp 的简单使用
2.OkHttp 提交请求
3.OkHttp 传说中的责任链的模式
OkHttp的简单使用
我们可以在项目的build.gradle 中简单的添加一句   implementation 'com.squareup.okhttp3:okhttp:3.10.0' 就可以将okhttp包含进来
当然要网络请求,还要配置相应的网络权限
下面是简单的提交一个同步的请求
 OkHttpClient client = new OkHttpClient();
 Request request = new Request.Builder()
                .url("http://www.baidu.com")
                .build();
 Response response = null;
 try
 {
    response = client.newCall(request).execute();
    response.body().string();
 }
 catch (IOException e)
 {
    e.printStackTrace();
 }

 提交一个异步的请求
 OkHttpClient client = new OkHttpClient();

 Request request = new Request.Builder()
                .url("http://www.baidu.com")
                .build();

 Response response = null;
 try
    {
        client.newCall(request).enqueue(new Callback()
        {
            @Override
            public void onFailure(Call call, IOException e)
            {

            }

            @Override
            public void onResponse(Call call, Response response) throws IOException
            {
                response.body().string();
            }
         });
        }
    catch (Exception e)
    {
        e.printStackTrace();
    }
OkHttp提交任务
1.创建OkHttpClient对象
OkHttpClient client = new OkHttpClient();
public OkHttpClient() {
  this(new Builder());
}

原来是方便我们使用,提供了一个“快捷操作”,全部使用了默认的配置。OkHttpClient.Builder类成员很多,后面我们再慢慢分析,这里先暂时略过:
public Builder() {
  dispatcher = new Dispatcher();
  protocols = DEFAULT_PROTOCOLS;
  connectionSpecs = DEFAULT_CONNECTION_SPECS;
  proxySelector = ProxySelector.getDefault();
  cookieJar = CookieJar.NO_COOKIES;
  socketFactory = SocketFactory.getDefault();
  hostnameVerifier = OkHostnameVerifier.INSTANCE;
  certificatePinner = CertificatePinner.DEFAULT;
  proxyAuthenticator = Authenticator.NONE;
  authenticator = Authenticator.NONE;
  connectionPool = new ConnectionPool();
  dns = Dns.SYSTEM;
  followSslRedirects = true;
  followRedirects = true;
  retryOnConnectionFailure = true;
  connectTimeout = 10_000;
  readTimeout = 10_000;
  writeTimeout = 10_000;
}

2.创建Request对象
Request request = new Request.Builder()
                .url("http://www.baidu.com")
                .build();

首先是Builder 构造函数的执行
public Builder() {
    this.method = "GET";
    this.headers = new Headers.Builder();
}


public Request build() {
      if (url == null) throw new IllegalStateException("url == null");
      return new Request(this);
}

创建Requeest内部也是通过Build模式来解析传递进来的url来构建一个请求对象

3.发起 HTTP 请求
Response response = client.newCall(request).execute();
response.body().string();

OkHttpClient实现了Call.Factory,负责根据请求创建新的Call。
public class OkHttpClient implements Cloneable, Call.Factory, WebSocket.Factory {
   ....
}

那我们现在就来看看它是如何创建 Call 的:
/**
  * Prepares the {@code request} to be executed at some point in the future.
  */
@Override public Call newCall(Request request) {
  return new RealCall(this, request);
}
如此看来功劳全在RealCall类了,下面我们一边分析同步网络请求的过程,一边了解RealCall的具体内容。 首先来看RealCall 的构造函数的创建
static RealCall newRealCall(OkHttpClient client, Request originalRequest, boolean forWebSocket) {
    // Safely publish the Call instance to the EventListener.
    RealCall call = new RealCall(client, originalRequest, forWebSocket);
    call.eventListener = client.eventListenerFactory().create(call);
    return call;
}

同步请求的执行 接着分析 RealCall#execute:
@Override public Response execute() throws IOException {
  synchronized (this) {
    if (executed) throw new IllegalStateException("Already Executed");  // (1)
    executed = true;
  }
  try {
    client.dispatcher().executed(this);                                 // (2)
    Response result = getResponseWithInterceptorChain();                // (3)
    if (result == null) throw new IOException("Canceled");
    return result;
  } finally {
    client.dispatcher().finished(this);                                 // (4)
  }
}

这里我们做了 4 件事:
检查这个 call 是否已经被执行了,每个 call 只能被执行一次,如果想要一个完全一样的 call,可以利用call#clone方法进行克隆。
利用client.dispatcher().executed(this)来进行实际执行dispatcher是刚才看到的OkHttpClient.Builder的成员之一,它的文档说自己是异步 HTTP 请求的执行策略,现在看来,
同步请求它也有掺和。调用getResponseWithInterceptorChain()函数获取 HTTP 返回结果,从函数名可以看出,这一步还会进行一系列“拦截”操作。这个会在后面进行分析
最后还要通知dispatcher自己已经执行完毕。

首先分析 client.dispatcher().executed(this) 实现,下面是对应的函数的实现
synchronized void executed(RealCall call) {
  runningSyncCalls.add(call);
}

而runningSyncCalls 的定义为   private final Deque<AsyncCall> runningAsyncCalls = new ArrayDeque<>(); 代表一个正在进行请求的同步队列,
而真正的执行网络请求的部分是在这部分的代码  getResponseWithInterceptorChain();所以对应同步的请求,这里只是创建一个RealCall然后添加到runningAsyncCalls 队列中

这里接下来分析 对于异步请求的添加
client.newCall(request).enqueue(new Callback());函数的实现为

@Override public void enqueue(Callback responseCallback) {
    synchronized (this) {
      if (executed) throw new IllegalStateException("Already Executed");
      executed = true;
    }
    captureCallStackTrace();
    eventListener.callStart(this);
    client.dispatcher().enqueue(new AsyncCall(responseCallback));
}

首先执行 new AsyncCall(responseCallback) 构建一个一个AsyncCall对象,AsyncCall本质是实现了Runnbale接口,同时将回调函数保存到responseCallback 成员变量中
final class AsyncCall extends NamedRunnable {
    private final Callback responseCallback;

    AsyncCall(Callback responseCallback) {
      super("OkHttp %s", redactedUrl());
      this.responseCallback = responseCallback;
    }
    ...
}

接着执行 client.dispatcher()会执行到默认的Dispatcher类,也即是Dispatcher类中的对应方法
synchronized void enqueue(AsyncCall call) {
    if (runningAsyncCalls.size() < maxRequests && runningCallsForHost(call) < maxRequestsPerHost) {
      runningAsyncCalls.add(call);
      executorService().execute(call);
    } else {
      readyAsyncCalls.add(call);
    }
}

runningAsyncCalls 定义为
private final Deque<AsyncCall> runningAsyncCalls = new ArrayDeque<>();
private int maxRequests = 64;
private int maxRequestsPerHost = 5;

上面的判断也即是如果当前正在运行的异步队列的大小,小于最大的同时请求的大小,对于同一个host的请求不能超过5个,才会将当前的请求,添加到runningAsyncCalls,
否则会添加到readyAsyncCalls 也即是一个异步的等待队列,当请求添加到了正在运行的异步队列的时候,执行 executorService().execute(call);

executorService()函数的实现:
public synchronized ExecutorService executorService() {
    if (executorService == null) {
      executorService = new ThreadPoolExecutor(0, Integer.MAX_VALUE, 60, TimeUnit.SECONDS,
          new SynchronousQueue<Runnable>(), Util.threadFactory("OkHttp Dispatcher", false));
    }
    return executorService;
}

大致的理解下这个线程池的配置,这个线程池核心线程数为0,但是最大的线程数量没有限制,60, TimeUnit.SECONDS 代表这些线程 空闲如果超过了60秒,就会被回收掉,
这里的队列为 new SynchronousQueue<Runnable>() 内部没有任何容量的阻塞队列。在它内部没有任何的缓存空间。也即是只要提交一个任务就会执行,不会添加到队列中

而由于当前的call 为 AsyncCall 所以当这个任务执行的时候,会执行对应的execute函数,下面是这个函数的关键实现
@Override protected void execute() {
    boolean signalledCallback = false;
    try {
        Response response = getResponseWithInterceptorChain();
        ...
    }
    ...
}

可以看出,最后执行的还是getResponseWithInterceptorChain()函数,这个才会真正的执行网络的请求等操作,对于同步跟异步的区别就是,同步直接在当前线程中跑这个函数,
异步的化,会通过任务的方式提交给线程池执行,当这个任务执行的时候,再来执行这个函数,这就是唯一的区别

所以对于异步的请求的添加也即是构建一个Runnable对象,然后通过线程池的形式,execute(call)的形式来添加任务,在添加任务的时候,会判断当前是否允许立刻执行,
如果不允许就放在等待队列中,如果当前的正在运行的请求队列执行完毕了,怎么样将正在等待的队列转移到执行的队列,会在分析完了责任链模式之后分析
OkHttp责任链模式(真正执行请求的地方)
前面分析了执行同步请求,跟执行异步请求的区别,最终都会执行execute函数,下面是这俩种exeuute函数的实现
执行异步请求的方法
@Override protected void execute() {
boolean signalledCallback = false;
try {
Response response = getResponseWithInterceptorChain();
if (retryAndFollowUpInterceptor.isCanceled()) {
signalledCallback = true;
responseCallback.onFailure(RealCall.this, new IOException("Canceled"));
} else {
signalledCallback = true;
responseCallback.onResponse(RealCall.this, response);
}
} catch (IOException e) {
if (signalledCallback) {
// Do not signal the callback twice!
Platform.get().log(INFO, "Callback failure for " + toLoggableString(), e);
} else {
eventListener.callFailed(RealCall.this, e);
responseCallback.onFailure(RealCall.this, e);
}
} finally {
client.dispatcher().finished(this);
}
}
执行同步请求的方法
@Override public Response execute() throws IOException {
synchronized (this) {
if (executed) throw new IllegalStateException("Already Executed");
executed = true;
}
captureCallStackTrace();
eventListener.callStart(this);
try {
client.dispatcher().executed(this);
Response result = getResponseWithInterceptorChain();
if (result == null) throw new IOException("Canceled");
return result;
} catch (IOException e) {
eventListener.callFailed(this, e);
throw e;
} finally {
client.dispatcher().finished(this);
}
}
可以看到对于异步还是同步的请求,关键都是通过 Response result = getResponseWithInterceptorChain(); 来获取到Resonse结果。下面是函数的具体实现:
Response getResponseWithInterceptorChain() throws IOException {
// Build a full stack of interceptors.
List<Interceptor> interceptors = new ArrayList<>();
interceptors.addAll(client.interceptors());
interceptors.add(retryAndFollowUpInterceptor);
interceptors.add(new BridgeInterceptor(client.cookieJar()));
interceptors.add(new CacheInterceptor(client.internalCache()));
interceptors.add(new ConnectInterceptor(client));
if (!forWebSocket) {
interceptors.addAll(client.networkInterceptors());
}
interceptors.add(new CallServerInterceptor(forWebSocket));
Interceptor.Chain chain = new RealInterceptorChain(interceptors, null, null, null, 0,
originalRequest, this, eventListener, client.connectTimeoutMillis(),
client.readTimeoutMillis(), client.writeTimeoutMillis());
return chain.proceed(originalRequest);
}
首先是构建一个集合用来存储Interceptor对象 List<Interceptor> interceptors = new ArrayList<>();,对于Interceptor本质是是一个接口,接口的定义为
public interface Interceptor {
Response intercept(Chain chain) throws IOException;
}
接下来就是往集合中添加元素了,第一个 interceptors.addAll(client.interceptors()); 获取的是用户自定义的拦截器集合,Okhttp是允许自定义拦截器的,
接下来添加的是Okhttp内部的拦截器对象对应的拦截器功能为:
负责失败重试以及重定向的RetryAndFollowUpInterceptor;
负责把用户构造的请求转换为发送到服务器的请求、把服务器返回的响应转换为用户友好的响应的BridgeInterceptor;
负责读取缓存直接返回、更新缓存的CacheInterceptor;
负责和服务器建立连接的ConnectInterceptor;
配置OkHttpClient时设置的networkInterceptors;
负责向服务器发送请求数据、从服务器读取响应数据CallServerInterceptor
添加完之后,然后构建一个RealInterceptorChain对象,这里有几个是比较关键的参数 比如第一个interceptors 代表拦截器的集合,index 代表当前拦截器的索引
也即是当前正要处理的拦截器相应的在集合中的索引,对应的构造方法的实现为:
public RealInterceptorChain(List<Interceptor> interceptors, StreamAllocation streamAllocation,
HttpCodec httpCodec, RealConnection connection, int index, Request request, Call call,
EventListener eventListener, int connectTimeout, int readTimeout, int writeTimeout) {
this.interceptors = interceptors;
this.connection = connection;
this.streamAllocation = streamAllocation;
this.httpCodec = httpCodec;
this.index = index;
this.request = request;
this.call = call;
this.eventListener = eventListener;
this.connectTimeout = connectTimeout;
this.readTimeout = readTimeout;
this.writeTimeout = writeTimeout;
}
然后执行 chain.proceed(originalRequest);定义的函数实现为
public Response proceed(Request request, StreamAllocation streamAllocation, HttpCodec httpCodec,
RealConnection connection) throws IOException {
if (index >= interceptors.size()) throw new AssertionError(); index代表当前正在执行的拦截器在集合中的索引,所以这个所以不能大于拦截器集合的大小值
...
// Call the next interceptor in the chain. 这里又构建一个RealInterceptorChain 对象,要注意这里的索引为index+1,而且其他的参数都为同一个对象
RealInterceptorChain next = new RealInterceptorChain(interceptors, streamAllocation, httpCodec,
connection, index + 1, request, call, eventListener, connectTimeout, readTimeout,
writeTimeout);
Interceptor interceptor = interceptors.get(index);然后从集合中获取到当前所有的Interceptor对象
Response response = interceptor.intercept(next);//然后执行对象的对应的方法,同时将刚构建的RealInterceptorChain对象传递进去,注意这里不会往下执行,跳到了另一边了
...
return response;
}
假设我们这里采用默认的配置,也即是我上面写的那样,就是没有配置自定义的拦截器的,所以第一个获取到的拦截器为retryAndFollowUpInterceptor 对象,代表重试的拦截器对象,
所以执行对应的方法
@Override public Response intercept(Chain chain) throws IOException {
//获取到Chain中的Request对象
Request request = chain.request();
RealInterceptorChain realChain = (RealInterceptorChain) chain;
//获取到Chain中的Call对象
Call call = realChain.call();
EventListener eventListener = realChain.eventListener();
//构建一个StreamAllocation对象
StreamAllocation streamAllocation = new StreamAllocation(client.connectionPool(),
createAddress(request.url()), call, eventListener, callStackTrace);
this.streamAllocation = streamAllocation;
int followUpCount = 0;
Response priorResponse = null;
//要注意这里是while(true)
while (true) {
if (canceled) {
streamAllocation.release();
throw new IOException("Canceled");
}
Response response;
boolean releaseConnection = true;
try {
//又调用了proceed函数
response = realChain.proceed(request, streamAllocation, null, null);
releaseConnection = false;
} catch (RouteException e) {
...
}
....
//当重试的此时大于了最大的限制之后,就会抛出一个异常,这样while(true)就会中断,支持重试终止
if (++followUpCount > MAX_FOLLOW_UPS) {
streamAllocation.release();
throw new ProtocolException("Too many follow-up requests: " + followUpCount);
}
...
request = followUp;
priorResponse = response;
}
}
当调用到 response = realChain.proceed(request, streamAllocation, null, null);的时候,此时,第二个参数streamAllocation有值了,第一次的时候,后面的三个参数都为null
public Response proceed(Request request, StreamAllocation streamAllocation, HttpCodec httpCodec, RealConnection connection) throws IOException {
if (index >= interceptors.size()) throw new AssertionError(); index代表当前正在执行的拦截器在集合中的索引,所以这个所以不能大于拦截器集合的大小值
...
// Call the next interceptor in the chain. 这里又构建一个RealInterceptorChain 对象,要注意这里的索引为index+1,而且其他的参数都为同一个对象
RealInterceptorChain next = new RealInterceptorChain(interceptors, streamAllocation, httpCodec,
connection, index + 1, request, call, eventListener, connectTimeout, readTimeout,
writeTimeout);
Interceptor interceptor = interceptors.get(index);然后从集合中获取到当前所有的Interceptor对象
Response response = interceptor.intercept(next);//然后执行对象的对应的方法,同时将刚构建的RealInterceptorChain对象传递进去,注意这里不会往下执行,跳到了另一边了
...
return response;
}
所以这次获取的Interceptor对象为BridgeInterceptor 对象,所以执行对应的方法 ,这个拦截器主要进行的操作就是用来拼接请求的
@Override public Response intercept(Chain chain) throws IOException {
//获取到chain中的Request对象
Request userRequest = chain.request();
//构建一个Request对象
Request.Builder requestBuilder = userRequest.newBuilder();
//拼接一些参数
RequestBody body = userRequest.body();
if (body != null) {
MediaType contentType = body.contentType();
if (contentType != null) {
requestBuilder.header("Content-Type", contentType.toString());
}
long contentLength = body.contentLength();
if (contentLength != -1) {
requestBuilder.header("Content-Length", Long.toString(contentLength));
requestBuilder.removeHeader("Transfer-Encoding");
} else {
requestBuilder.header("Transfer-Encoding", "chunked");
requestBuilder.removeHeader("Content-Length");
}
}
if (userRequest.header("Host") == null) {
requestBuilder.header("Host", hostHeader(userRequest.url(), false));
}
if (userRequest.header("Connection") == null) {
requestBuilder.header("Connection", "Keep-Alive");
}
// If we add an "Accept-Encoding: gzip" header field we're responsible for also decompressing
// the transfer stream.
boolean transparentGzip = false;
if (userRequest.header("Accept-Encoding") == null && userRequest.header("Range") == null) {
transparentGzip = true;
requestBuilder.header("Accept-Encoding", "gzip");
}
List<Cookie> cookies = cookieJar.loadForRequest(userRequest.url());
if (!cookies.isEmpty()) {
requestBuilder.header("Cookie", cookieHeader(cookies));
}
if (userRequest.header("User-Agent") == null) {
requestBuilder.header("User-Agent", Version.userAgent());
}
//又执行到了chain中的proceed函数,继而转到对应的方法实现
Response networkResponse = chain.proceed(requestBuilder.build());
//下面不会再往下面执行,要等待上面的方式执行完毕之后,才会往下执行,也即是后面是请求结果的处理了
HttpHeaders.receiveHeaders(cookieJar, userRequest.url(), networkResponse.headers());
Response.Builder responseBuilder = networkResponse.newBuilder()
.request(userRequest);
if (transparentGzip
&& "gzip".equalsIgnoreCase(networkResponse.header("Content-Encoding"))
&& HttpHeaders.hasBody(networkResponse)) {
GzipSource responseBody = new GzipSource(networkResponse.body().source());
Headers strippedHeaders = networkResponse.headers().newBuilder()
.removeAll("Content-Encoding")
.removeAll("Content-Length")
.build();
responseBuilder.headers(strippedHeaders);
String contentType = networkResponse.header("Content-Type");
responseBuilder.body(new RealResponseBody(contentType, -1L, Okio.buffer(responseBody)));
}
return responseBuilder.build();
}
执行到 chain.proceed(requestBuilder.build());
public Request build() {
if (url == null) throw new IllegalStateException("url == null");
return new Request(this);
}
构建一个Request对象,存储Http的请求地址,请求头,请求体等
Request(Builder builder) {
this.url = builder.url;
this.method = builder.method;
this.headers = builder.headers.build();
this.body = builder.body;
this.tag = builder.tag != null ? builder.tag : this;
}
之后继续执行 chain.proceed()函数
@Override public Response proceed(Request request) throws IOException {
return proceed(request, streamAllocation, httpCodec, connection);
}
只是这个时候执行到了这里的时候requet已经构建完成了,第二个参数也因为重新构建RealInterceptorChain的时候,传递了进来,所以得以保存
public Response proceed(Request request, StreamAllocation streamAllocation, HttpCodec httpCodec, RealConnection connection) throws IOException {
if (index >= interceptors.size()) throw new AssertionError(); index代表当前正在执行的拦截器在集合中的索引,所以这个所以不能大于拦截器集合的大小值
...
// Call the next interceptor in the chain. 这里又构建一个RealInterceptorChain 对象,要注意这里的索引为index+1,而且其他的参数都为同一个对象
RealInterceptorChain next = new RealInterceptorChain(interceptors, streamAllocation, httpCodec,
connection, index + 1, request, call, eventListener, connectTimeout, readTimeout,
writeTimeout);
Interceptor interceptor = interceptors.get(index);然后从集合中获取到当前所有的Interceptor对象
Response response = interceptor.intercept(next);//然后执行对象的对应的方法,同时将刚构建的RealInterceptorChain对象传递进去,注意这里不会往下执行,跳到了另一边了
...
return response;
}
当执行interceptors.get(index)的时候,这里获取到的Interceptor对象为CacheInterceptor 对象,执行对应的方法
@Override public Response intercept(Chain chain) throws IOException {
...
// If we don't need the network, we're done. 如果有缓存,就直接从缓存中获取
if (networkRequest == null) {
return cacheResponse.newBuilder()
.cacheResponse(stripBody(cacheResponse))
.build();
}
//否则执行网络请求
Response networkResponse = null;
try {
networkResponse = chain.proceed(networkRequest);
} finally {
// If we're crashing on I/O or otherwise, don't leak the cache body.
if (networkResponse == null && cacheCandidate != null) {
closeQuietly(cacheCandidate.body());
}
}
...
}
这里假设没有缓存,也即是第一次执行的时候,所以会执行 networkResponse = chain.proceed(networkRequest)
@Override public Response proceed(Request request) throws IOException {
return proceed(request, streamAllocation, httpCodec, connection);
}
这里将原先的Request变成了newWorkRequest,然后存储到request参数中,至于其他的参数也有保存起来在构建RealInterceptorChain的时候
public Response proceed(Request request, StreamAllocation streamAllocation, HttpCodec httpCodec, RealConnection connection) throws IOException {
if (index >= interceptors.size()) throw new AssertionError(); index代表当前正在执行的拦截器在集合中的索引,所以这个所以不能大于拦截器集合的大小值
...
// Call the next interceptor in the chain. 这里又构建一个RealInterceptorChain 对象,要注意这里的索引为index+1,而且其他的参数都为同一个对象
RealInterceptorChain next = new RealInterceptorChain(interceptors, streamAllocation, httpCodec,
connection, index + 1, request, call, eventListener, connectTimeout, readTimeout,
writeTimeout);
Interceptor interceptor = interceptors.get(index);然后从集合中获取到当前所有的Interceptor对象
Response response = interceptor.intercept(next);//然后执行对象的对应的方法,同时将刚构建的RealInterceptorChain对象传递进去,注意这里不会往下执行,跳到了另一边了
...
return response;
}
当执行interceptors.get(index)的时候,这里获取到的Interceptor对象为ConnectInterceptor 对象,执行对应的方法
@Override public Response intercept(Chain chain) throws IOException {
RealInterceptorChain realChain = (RealInterceptorChain) chain;
//获取到Request对象,也即是获取到第三个拦截器中传递的Request对象
Request request = realChain.request();
//获取到StreamAllocation 对象,也即是第一个拦截器中构建的对象
StreamAllocation streamAllocation = realChain.streamAllocation();
// We need the network to satisfy this request. Possibly for validating a conditional GET.
boolean doExtensiveHealthChecks = !request.method().equals("GET");
//得到一个HttpCodec对象
HttpCodec httpCodec = streamAllocation.newStream(client, chain, doExtensiveHealthChecks);
//得到RealConnection对象
RealConnection connection = streamAllocation.connection();
//执行下一个拦截器
return realChain.proceed(request, streamAllocation, httpCodec, connection);
}
首先分析 HttpCodec httpCodec = streamAllocation.newStream(client, chain, doExtensiveHealthChecks);的实现
public HttpCodec newStream(OkHttpClient client, Interceptor.Chain chain, boolean doExtensiveHealthChecks) {
int connectTimeout = chain.connectTimeoutMillis();
int readTimeout = chain.readTimeoutMillis();
int writeTimeout = chain.writeTimeoutMillis();
int pingIntervalMillis = client.pingIntervalMillis();
boolean connectionRetryEnabled = client.retryOnConnectionFailure();
try {
//RealConnection 对Socket连接的封装
//TPC/IP协议是传输层协议,主要解决数据如何在网络中传输
//Socket则是对TCP/IP协议的封装和应用(程序员层面上)。
//Http 应用层协议,解决如何包装数据
//使用Http协议封装数据,借助TCP/IP协议的实现:Socket 进行数据传输
RealConnection resultConnection = findHealthyConnection(connectTimeout, readTimeout,
writeTimeout, pingIntervalMillis, connectionRetryEnabled,
doExtensiveHealthChecks);
//HttpCodec 处理解析请求与响应的工具类
HttpCodec resultCodec = resultConnection.newCodec(client, chain, this);
synchronized (connectionPool) {
codec = resultCodec;
return resultCodec;
}
} catch (IOException e) {
throw new RouteException(e);
}
}
//查找连接并在健康状况下返回。 如果不健康,则重复该过程直到找到健康的连接一直没找到,最终创建新的socket连接。
private RealConnection findHealthyConnection(int connectTimeout, int readTimeout,
int writeTimeout, int pingIntervalMillis,
boolean connectionRetryEnabled,
boolean doExtensiveHealthChecks) throws IOException {
while (true) {
//TODO 真正找连接的方法
RealConnection candidate = findConnection(connectTimeout, readTimeout, writeTimeout,
pingIntervalMillis, connectionRetryEnabled);
// If this is a brand new connection, we can skip the extensive health checks.
synchronized (connectionPool) {
if (candidate.successCount == 0) {
return candidate;
}
}
// Do a (potentially slow) check to confirm that the pooled connection is still good.
// If it
// isn't, take it out of the pool and start again.
if (!candidate.isHealthy(doExtensiveHealthChecks)) {
noNewStreams();
continue;
}
return candidate;
}
}
findConnection 函数的实现为:
private RealConnection findConnection(int connectTimeout, int readTimeout, int writeTimeout,
int pingIntervalMillis, boolean connectionRetryEnabled) throws IOException {
boolean foundPooledConnection = false;
RealConnection result = null;
Route selectedRoute = null;
Connection releasedConnection;
Socket toClose;
synchronized (connectionPool) {
....
//TODO 从连接池中获取连接 (先看put加入连接池)
if (result == null) {
// Attempt to get a connection from the pool.
Internal.instance.get(connectionPool, address, this, null);
if (connection != null) {
foundPooledConnection = true;
result = connection;
} else {
selectedRoute = route;
}
}
}
...
//TODO 连接可用就返回 否则需要创建新的连接
if (result != null) {
// If we found an already-allocated or pooled connection, we're done.
return result;
}
// If we need a route selection, make one. This is a blocking operation.
boolean newRouteSelection = false;
if (selectedRoute == null && (routeSelection == null || !routeSelection.hasNext())) {
newRouteSelection = true;
routeSelection = routeSelector.next();
}
synchronized (connectionPool) {
if (canceled) throw new IOException("Canceled");
if (newRouteSelection) {
// Now that we have a set of IP addresses, make another attempt at getting a
// connection from
// the pool. This could match due to connection coalescing.
List<Route> routes = routeSelection.getAll();
for (int i = 0, size = routes.size(); i < size; i++) {
Route route = routes.get(i);
Internal.instance.get(connectionPool, address, this, route);//从connectionPool中获取可用的连接
//如果获取到了可用的连接,标识 foundPooledConnection 已经找到了连接,将找到的连接赋值给 result ,break程序
if (connection != null) {
foundPooledConnection = true;
result = connection;
this.route = route;
break;
}
}
}
//如果到了这里就说明没有找到可以用的连接
if (!foundPooledConnection) {
if (selectedRoute == null) {
selectedRoute = routeSelection.next();
}
// Create a connection and assign it to this allocation immediately. This makes
// it possible
// for an asynchronous cancel() to interrupt the handshake we're about to do.
route = selectedRoute;
refusedStreamCount = 0;
// 创建新的连接
result = new RealConnection(connectionPool, selectedRoute);
acquire(result, false);
}
}
// If we found a pooled connection on the 2nd time around, we're done.
if (foundPooledConnection) {
eventListener.connectionAcquired(call, result);
return result;
}
// 执行连接
// Do TCP + TLS handshakes. This is a blocking operation.
result.connect(connectTimeout, readTimeout, writeTimeout, pingIntervalMillis,connectionRetryEnabled, call, eventListener);
routeDatabase().connected(result.route());
Socket socket = null;
synchronized (connectionPool) {
reportedAcquired = true;
//加入连接池
// Pool the connection.
Internal.instance.put(connectionPool, result);
// If another multiplexed connection to the same address was created concurrently, then
// release this connection and acquire that one.
if (result.isMultiplexed()) {
socket = Internal.instance.deduplicate(connectionPool, address, this);
result = connection;
}
}
closeQuietly(socket);
eventListener.connectionAcquired(call, result);
return result;
}
这里先分析下 Internal.instance.get(connectionPool, address, this, route); 函数的实现为
//静态的对象
static {
Internal.instance = new Internal() {
....
@Override
public RealConnection get(ConnectionPool pool, Address address,StreamAllocation streamAllocation, Route route) {
return pool.get(address, streamAllocation, route);
}
...
}
}
pool.get(address, streamAllocation, route);函数实现为
RealConnection get(Address address, StreamAllocation streamAllocation, Route route) {
assert (Thread.holdsLock(this));
//TODO 遍历
for (RealConnection connection : connections) {
//TODO 检查连接是否复用
if (connection.isEligible(address, route)) {
streamAllocation.acquire(connection, true);
return connection;
}
}
return null;
}
connections本质为 private final Deque<RealConnection> connections = new ArrayDeque<>();
connection.isEligible(address, route)函数实现为:
public boolean isEligible(Address address, @Nullable Route route) {
// If this connection is not accepting new streams, we're done.
if (allocations.size() >= allocationLimit || noNewStreams) return false;
// If the non-host fields of the address don't overlap, we're done.
if (!Internal.instance.equalsNonHost(this.route.address(), address)) return false;
// If the host exactly matches, we're done: this connection can carry the address.
if (address.url().host().equals(this.route().address().url().host())) {
return true; // This connection is a perfect match.
}
...
return true; // The caller's address can be carried by this connection.
}
可以看出复用的条件是host要为一样才能实现复用
假设程序第一次使用,这里就不能够从缓存池中获取到可用的连接,所以 程序就会继续的往下执行 当执行到
//TODO 创建新的连接 ,创建一个RealConnection对象
result = new RealConnection(connectionPool, selectedRoute);
//接着 执行连接
// Do TCP + TLS handshakes. This is a blocking operation.
result.connect(connectTimeout, readTimeout, writeTimeout, pingIntervalMillis,connectionRetryEnabled, call, eventListener);
//连接操作
public void connect(int connectTimeout, int readTimeout, int writeTimeout,
int pingIntervalMillis, boolean connectionRetryEnabled, Call call,
EventListener eventListener) {
if (protocol != null) throw new IllegalStateException("already connected");
...
//连接socket
connectSocket(connectTimeout, readTimeout, call, eventListener);
...
}
connectSocket() 函数的实现为:
/** Does all the work necessary to build a full HTTP or HTTPS connection on a raw socket. */
private void connectSocket(int connectTimeout, int readTimeout, Call call,
EventListener eventListener) throws IOException {
/**
* TODO ProxySelector.getDefault().select(new URI("path"));
*/
Proxy proxy = route.proxy();
Address address = route.address();
//创建socket对象,这里会直接的创建一个Sokcet对象,通过 new Socket(proxy)的方式
rawSocket = proxy.type() == Proxy.Type.DIRECT || proxy.type() == Proxy.Type.HTTP
? address.socketFactory().createSocket()
: new Socket(proxy);
//回调通知连接开始
eventListener.connectStart(call, route.socketAddress(), proxy);
//设置连接socket超时时间
rawSocket.setSoTimeout(readTimeout);
try {
//执行socket的连接 连接的地址为route.socketAddress() 具体的实现类 AndroidPlatform
Platform.get().connectSocket(rawSocket, route.socketAddress(), connectTimeout);
} catch (ConnectException e) {
ConnectException ce = new ConnectException("Failed to connect to " + route.socketAddress());
ce.initCause(e);
throw ce;
}
// The following try/catch block is a pseudo hacky way to get around a crash on Android 7.0
// More details:
// https://github.com/square/okhttp/issues/3245
// https://android-review.googlesource.com/#/c/271775/
try {
//连接完socket之后,获取到对应的socket的InputStream 以及 OutputStream
//Okio.source 主要是获取到socket.getInputStream()
source = Okio.buffer(Okio.source(rawSocket));
//Okio.sink 主要是获取到socket.getOutputStream()
sink = Okio.buffer(Okio.sink(rawSocket));
} catch (NullPointerException npe) {
if (NPE_THROW_WITH_NULL.equals(npe.getMessage())) {
throw new IOException(npe);
}
}
}
Platform.get().connectSocket(rawSocket, route.socketAddress(), connectTimeout);函数的实现为:
//执行socket的连接
@Override public void connectSocket(Socket socket, InetSocketAddress address,int connectTimeout) throws IOException {
try {
//socket的连接操作,最终还是调用了socket的connect函数完成连接的操作
socket.connect(address, connectTimeout);
} catch (AssertionError e) {
if (Util.isAndroidGetsocknameError(e)) throw new IOException(e);
throw e;
} catch (SecurityException e) {
// Before android 4.3, socket.connect could throw a SecurityException
// if opening a socket resulted in an EACCES error.
IOException ioException = new IOException("Exception in connect");
ioException.initCause(e);
throw ioException;
} catch (ClassCastException e) {
// On android 8.0, socket.connect throws a ClassCastException due to a bug
// see https://issuetracker.google.com/issues/63649622
if (Build.VERSION.SDK_INT == 26) {
IOException ioException = new IOException("Exception in connect");
ioException.initCause(e);
throw ioException;
} else {
throw e;
}
}
}
程序继续往下面执行
source = Okio.buffer(Okio.source(rawSocket));
//Okio.sink 主要是获取到socket.getOutputStream()
sink = Okio.buffer(Okio.sink(rawSocket));
Okio.source(rawSocket)函数的实现为
public static Source source(Socket socket) throws IOException {
if (socket == null) throw new IllegalArgumentException("socket == null");
if (socket.getInputStream() == null) throw new IOException("socket's input stream == null");
AsyncTimeout timeout = timeout(socket);
Source source = source(socket.getInputStream(), timeout);
return timeout.source(source);
}
可以看出最终是获取到socket中的inputStream封装在Source对象中
sink = Okio.buffer(Okio.sink(rawSocket));函数的实现为:
public static Sink sink(Socket socket) throws IOException {
if (socket == null) throw new IllegalArgumentException("socket == null");
if (socket.getOutputStream() == null) throw new IOException("socket's output stream == null");
AsyncTimeout timeout = timeout(socket);
Sink sink = sink(socket.getOutputStream(), timeout);
return timeout.sink(sink);
}
可以看出最终是获取到socket中的OutputStream封装在Sink对象中
findConnection函数继续往下面执行,当执行到了这里
synchronized (connectionPool) {
reportedAcquired = true;
//TODO 加入连接池
// Pool the connection.
Internal.instance.put(connectionPool, result);
...
}
最终的函数实现会进入到ConnectPool中对应的函数
void put(RealConnection connection) {
assert (Thread.holdsLock(this));
//TODO 每次加入缓存 先执行检测清理
if (!cleanupRunning) {
cleanupRunning = true;
executor.execute(cleanupRunnable);
}
//最终将这个连接保存到了连接池的队列中
connections.add(connection);
}
下面来分析下连接池中的清理操作: 连接池里面有一个线程是用来清理连接的,清理当一个连接在连接池中超过了最大的存活的时间之后,就会被清理掉
cleanupRunning为一个标识 boolean cleanupRunning; 标识当前的清理线程是否正在运行
//构建一个线程池 ,同时Util.threadFactory("OkHttp ConnectionPool", true) 后面的参数设置为true,代表他是一个守护线程
private static final Executor executor = new ThreadPoolExecutor(0 /* corePoolSize */,
Integer.MAX_VALUE /* maximumPoolSize */, 60L /* keepAliveTime */, TimeUnit.SECONDS,
new SynchronousQueue<Runnable>(), Util.threadFactory("OkHttp ConnectionPool", true));
嗯,这个清理的线程池跟异步任务执行的线程池配置是一样的,除了最后一个参数 Util.threadFactory("OkHttp ConnectionPool", true)
public static ThreadFactory threadFactory(final String name, final boolean daemon) {
return new ThreadFactory() {
@Override public Thread newThread(Runnable runnable) {
Thread result = new Thread(runnable, name);
//TODO 是否设置为守护线程 ,设置为守护线程化,当一个应用程序当没有任何的线程正在运行的化,此时守护线程会退出,如果不设置为守护线程的化,
//那么这个应用程序就不会退出
result.setDaemon(daemon);
return result;
}
};
}
//最大闲置连接数量
private final int maxIdleConnections;
//每个连接的最大存活时间
private final long keepAliveDurationNs;
//清理线程 Runnable任务实现
private final Runnable cleanupRunnable = new Runnable() {
@Override
public void run() {
while (true) {
//获取下一个需要的清理的时间
long waitNanos = cleanup(System.nanoTime());
if (waitNanos == -1) return;
if (waitNanos > 0) {
long waitMillis = waitNanos / 1000000L;
waitNanos -= (waitMillis * 1000000L);
synchronized (ConnectionPool.this) {
try {
//等待多久达到最大闲置
ConnectionPool.this.wait(waitMillis, (int) waitNanos);
} catch (InterruptedException ignored) {
}
}
}
}
}
};
long waitNanos = cleanup(System.nanoTime());函数的实现为:
long cleanup(long now) {
int inUseConnectionCount = 0;
int idleConnectionCount = 0;
RealConnection longestIdleConnection = null;
long longestIdleDurationNs = Long.MIN_VALUE;
// Find either a connection to evict, or the time that the next eviction is due.
synchronized (this) {
//遍历当前所有连接
for (Iterator<RealConnection> i = connections.iterator(); i.hasNext(); ) {
RealConnection connection = i.next();
//TODO 正在使用 小于0表示闲置
// If the connection is in use, keep searching.
if (pruneAndGetAllocationCount(connection, now) > 0) {
inUseConnectionCount++;
continue;
}
idleConnectionCount++;
// If the connection is ready to be evicted, we're done.
//TODO 获得的最长闲置时间的连接
long idleDurationNs = now - connection.idleAtNanos;
if (idleDurationNs > longestIdleDurationNs) {
longestIdleDurationNs = idleDurationNs;
longestIdleConnection = connection;
}
}
//TODO 闲置时间大于最大保存时间 或者连接闲置数量大于最大允许闲置数 则移除最长闲置的连接
if (longestIdleDurationNs >= this.keepAliveDurationNs
|| idleConnectionCount > this.maxIdleConnections) {
// We've found a connection to evict. Remove it from the list, then close it
// below (outside
// of the synchronized block).
connections.remove(longestIdleConnection);
} else if (idleConnectionCount > 0) {
//TODO 闲置数量大于0(存在闲置连接) 获得等待时间(等待多久达到最大闲置)
// A connection will be ready to evict soon.
return keepAliveDurationNs - longestIdleDurationNs;
} else if (inUseConnectionCount > 0) {
//TODO 存在正在使用连接
// All connections are in use. It'll be at least the keep alive duration 'til we
// run again.
return keepAliveDurationNs;
} else {
//TODO 连接池中不存在连接
// No connections, idle or in use.
cleanupRunning = false;
return -1;
}
}
closeQuietly(longestIdleConnection.socket());
// Cleanup again immediately.
return 0;
}
回到前面 函数继续执行
public HttpCodec newStream(
OkHttpClient client, Interceptor.Chain chain, boolean doExtensiveHealthChecks) {
int connectTimeout = chain.connectTimeoutMillis();
int readTimeout = chain.readTimeoutMillis();
int writeTimeout = chain.writeTimeoutMillis();
int pingIntervalMillis = client.pingIntervalMillis();
boolean connectionRetryEnabled = client.retryOnConnectionFailure();
try {
//TODO RealConnection 对Socket连接的封装
//TODO TPC/IP协议是传输层协议,主要解决数据如何在网络中传输
//TODO Socket则是对TCP/IP协议的封装和应用(程序员层面上)。
//TODO Http 应用层协议,解决如何包装数据
//TODO 使用Http协议封装数据,借助TCP/IP协议的实现:Socket 进行数据传输
RealConnection resultConnection = findHealthyConnection(connectTimeout, readTimeout,
writeTimeout, pingIntervalMillis, connectionRetryEnabled,
doExtensiveHealthChecks);
//TODO HttpCodec 处理解析请求与响应的工具类
HttpCodec resultCodec = resultConnection.newCodec(client, chain, this);
synchronized (connectionPool) {
codec = resultCodec;
return resultCodec;
}
} catch (IOException e) {
throw new RouteException(e);
}
}
当程序执行到 HttpCodec resultCodec = resultConnection.newCodec(client, chain, this);
//得到一个HttpCodec对象
public HttpCodec newCodec(OkHttpClient client, Interceptor.Chain chain,
StreamAllocation streamAllocation) throws SocketException {
if (http2Connection != null) {
return new Http2Codec(client, chain, streamAllocation, http2Connection);
} else {
//设置socket的超时时间
socket.setSoTimeout(chain.readTimeoutMillis());
//设置socket的读取超时时间
source.timeout().timeout(chain.readTimeoutMillis(), MILLISECONDS);
//设置socket的写超时时间
sink.timeout().timeout(chain.writeTimeoutMillis(), MILLISECONDS);
//然后构建一个Http1Codec对象
return new Http1Codec(client, streamAllocation, source, sink);
}
}
这里我们会构建一个Http1Codec对象 ,对应的构造函数为:
//构建一个Http1Codec对象,source 为OutPutStream的封装 sink为InputStream的封装
public Http1Codec(OkHttpClient client, StreamAllocation streamAllocation, BufferedSource source,BufferedSink sink) {
this.client = client;
this.streamAllocation = streamAllocation;
this.source = source;
this.sink = sink;
}
函数继续执行到了ConnectInterceptor中的intercept中
@Override public Response intercept(Chain chain) throws IOException {
RealInterceptorChain realChain = (RealInterceptorChain) chain;
Request request = realChain.request();
StreamAllocation streamAllocation = realChain.streamAllocation();
// We need the network to satisfy this request. Possibly for validating a conditional GET.
boolean doExtensiveHealthChecks = !request.method().equals("GET");
//TODO 连接服务器/复用socket
HttpCodec httpCodec = streamAllocation.newStream(client, chain, doExtensiveHealthChecks);
//得到RealConnection对象
RealConnection connection = streamAllocation.connection();
//执行下一个拦截器
return realChain.proceed(request, streamAllocation, httpCodec, connection);
}
}
当执行 realChain.proceed(request, streamAllocation, httpCodec, connection);的时候,此时四个参数都有值了
public Response proceed(Request request, StreamAllocation streamAllocation, HttpCodec httpCodec, RealConnection connection) throws IOException {
if (index >= interceptors.size()) throw new AssertionError(); index代表当前正在执行的拦截器在集合中的索引,所以这个所以不能大于拦截器集合的大小值
...
// Call the next interceptor in the chain. 这里又构建一个RealInterceptorChain 对象,要注意这里的索引为index+1,而且其他的参数都为同一个对象
RealInterceptorChain next = new RealInterceptorChain(interceptors, streamAllocation, httpCodec,
connection, index + 1, request, call, eventListener, connectTimeout, readTimeout,
writeTimeout);
Interceptor interceptor = interceptors.get(index);然后从集合中获取到当前所有的Interceptor对象
Response response = interceptor.intercept(next);//然后执行对象的对应的方法,同时将刚构建的RealInterceptorChain对象传递进去,注意这里不会往下执行,跳到了另一边了
...
return response;
}
这个时候获取到的是拦截器对象为CallServerInterceptor对象,执行对应的方法
@Override public Response intercept(Chain chain) throws IOException {
RealInterceptorChain realChain = (RealInterceptorChain) chain;
HttpCodec httpCodec = realChain.httpStream();
StreamAllocation streamAllocation = realChain.streamAllocation();
RealConnection connection = (RealConnection) realChain.connection();
Request request = realChain.request();
long sentRequestMillis = System.currentTimeMillis();
//回调写请求头开始
realChain.eventListener().requestHeadersStart(realChain.call());
//写请求头
httpCodec.writeRequestHeaders(request);
//回调写请求头结束
realChain.eventListener().requestHeadersEnd(realChain.call(), request);
Response.Builder responseBuilder = null;
....
//完成请求,
httpCodec.finishRequest();
//构建ResonseBuilder对象
if (responseBuilder == null) {
realChain.eventListener().responseHeadersStart(realChain.call());
responseBuilder = httpCodec.readResponseHeaders(false);
}
Response response = responseBuilder
.request(request)
.handshake(streamAllocation.connection().handshake())
.sentRequestAtMillis(sentRequestMillis)
.receivedResponseAtMillis(System.currentTimeMillis())
.build();
//获取返回的状态码
int code = response.code();
if (code == 100) {
// server sent a 100-continue even though we did not request one.
// try again to read the actual response
responseBuilder = httpCodec.readResponseHeaders(false);
response = responseBuilder
.request(request)
.handshake(streamAllocation.connection().handshake())
.sentRequestAtMillis(sentRequestMillis)
.receivedResponseAtMillis(System.currentTimeMillis())
.build();
code = response.code();
}
...
//返回读取的结果
return response;
}
首先分析
//写请求头
httpCodec.writeRequestHeaders(request); 函数的实现为:
@Override public void writeRequestHeaders(Request request) throws IOException {
String requestLine = RequestLine.get(request, streamAllocation.connection().route().proxy().type());
writeRequest(request.headers(), requestLine);
}
/** Returns bytes of a request header for sending on an HTTP transport. */
//写请求头,最终是调用sink的write方法,sink为sokcet的OutputStream的封装,所以最终是将结果写到了sokcet的OutputStream中
public void writeRequest(Headers headers, String requestLine) throws IOException {
if (state != STATE_IDLE) throw new IllegalStateException("state: " + state);
sink.writeUtf8(requestLine).writeUtf8("\r\n");
for (int i = 0, size = headers.size(); i < size; i++) {
sink.writeUtf8(headers.name(i))
.writeUtf8(": ")
.writeUtf8(headers.value(i))
.writeUtf8("\r\n");
}
sink.writeUtf8("\r\n");
state = STATE_OPEN_REQUEST_BODY;
}
最终是调用sink的write方法,sink为sokcet的OutputStream的封装,所以最终是将结果写到了sokcet的OutputStream中
之后执行
//构建ResonseBuilder对象
if (responseBuilder == null) {
realChain.eventListener().responseHeadersStart(realChain.call());
responseBuilder = httpCodec.readResponseHeaders(false);
}
responseBuilder = httpCodec.readResponseHeaders(false); 函数的实现为:
//获取Response Headers
@Override public Response.Builder readResponseHeaders(boolean expectContinue) throws IOException {
if (state != STATE_OPEN_REQUEST_BODY && state != STATE_READ_RESPONSE_HEADERS) {
throw new IllegalStateException("state: " + state);
}
try {
//通过socket中的来获取返回的结果,这里读取状态栏,将读取的结果封装成一个StatusLine对象
StatusLine statusLine = StatusLine.parse(readHeaderLine());
//将读取的状态栏的结果,封装成Response.Builder对象
Response.Builder responseBuilder = new Response.Builder()
.protocol(statusLine.protocol)
.code(statusLine.code)
.message(statusLine.message)
.headers(readHeaders());
if (expectContinue && statusLine.code == HTTP_CONTINUE) {
return null;
} else if (statusLine.code == HTTP_CONTINUE) {
state = STATE_READ_RESPONSE_HEADERS;
return responseBuilder;
}
state = STATE_OPEN_RESPONSE_BODY;
return responseBuilder;
} catch (EOFException e) {
// Provide more context if the server ends the stream before sending a response.
IOException exception = new IOException("unexpected end of stream on " + streamAllocation);
exception.initCause(e);
throw exception;
}
}
StatusLine statusLine = StatusLine.parse(readHeaderLine());函数的实现为:
//读取请求结果的头部内容
private String readHeaderLine() throws IOException {
//source 为 socket的InputStream的封装,所以一旦连接上,就可以获取返回的结果了
String line = source.readUtf8LineStrict(headerLimit);
headerLimit -= line.length();
return line;
}
Response response = responseBuilder
.request(request)
.handshake(streamAllocation.connection().handshake())
.sentRequestAtMillis(sentRequestMillis)
.receivedResponseAtMillis(System.currentTimeMillis())
.build();
可以看出最终是调用了 source 为 socket的InputStream的封装,所以一旦连接上,就可以获取返回的结果了,接下来就是解析返回的请求头了,之后封装成一个response对象返回
继而回到了ConnectInterceptor 中的Intercept函数
@Override public Response intercept(Chain chain) throws IOException {
RealInterceptorChain realChain = (RealInterceptorChain) chain;
Request request = realChain.request();
StreamAllocation streamAllocation = realChain.streamAllocation();
// We need the network to satisfy this request. Possibly for validating a conditional GET.
boolean doExtensiveHealthChecks = !request.method().equals("GET");
//TODO 连接服务器/复用socket
HttpCodec httpCodec = streamAllocation.newStream(client, chain, doExtensiveHealthChecks);
//得到RealConnection对象
RealConnection connection = streamAllocation.connection();
//执行下一个拦截器
return realChain.proceed(request, streamAllocation, httpCodec, connection);
}
发现他没有任何的处理,是直接的返回,所以又回到了另一个拦截器那
@Override public Response intercept(Chain chain) throws IOException {
.....
//TODO 执行下一个拦截器
Response networkResponse = null;
try {
networkResponse = chain.proceed(networkRequest);
} finally {
// If we're crashing on I/O or otherwise, don't leak the cache body.
if (networkResponse == null && cacheCandidate != null) {
closeQuietly(cacheCandidate.body());
}
}
// If we have a cache response too, then we're doing a conditional get.
//TODO 如果存在缓存 更新
if (cacheResponse != null) {
//TODO 304响应码 自从上次请求后,请求需要响应的内容未发生改变
if (networkResponse.code() == HTTP_NOT_MODIFIED) {
Response response = cacheResponse.newBuilder()
.headers(combine(cacheResponse.headers(), networkResponse.headers()))
.sentRequestAtMillis(networkResponse.sentRequestAtMillis())
.receivedResponseAtMillis(networkResponse.receivedResponseAtMillis())
.cacheResponse(stripBody(cacheResponse))
.networkResponse(stripBody(networkResponse))
.build();
networkResponse.body().close();
// Update the cache after combining headers but before stripping the
// Content-Encoding header (as performed by initContentStream()).
cache.trackConditionalCacheHit();
cache.update(cacheResponse, response);
return response;
} else {
closeQuietly(cacheResponse.body());
}
}
//TODO 缓存Response
Response response = networkResponse.newBuilder()
.cacheResponse(stripBody(cacheResponse))
.networkResponse(stripBody(networkResponse))
.build();
//如果当前是有设置cache对象的
if (cache != null) {
//判断当前的respon有body部分,并且当前的请求是允许缓存的
if (HttpHeaders.hasBody(response) && CacheStrategy.isCacheable(response, networkRequest)) {
// Offer this request to the cache.
//缓存当前的结果,缓存是使用DiskLru算法来实现的
CacheRequest cacheRequest = cache.put(response);
return cacheWritingResponse(cacheRequest, response);
}
//如果当前的缓存是非法的缓存,就移除掉
if (HttpMethod.invalidatesCache(networkRequest.method())) {
try {
cache.remove(networkRequest);
} catch (IOException ignored) {
// The cache cannot be written.
}
}
}
如果我们这里给了cache 并且给的是Okhttp中的InternalCache,那么 cache.put(response); 就会执行到对应的方法
final InternalCache internalCache = new InternalCache() {
@Override public Response get(Request request) throws IOException {
return Cache.this.get(request);
}
@Override public CacheRequest put(Response response) throws IOException {
return Cache.this.put(response);
}
@Override public void remove(Request request) throws IOException {
Cache.this.remove(request);
}
@Override public void update(Response cached, Response network) {
Cache.this.update(cached, network);
}
@Override public void trackConditionalCacheHit() {
Cache.this.trackConditionalCacheHit();
}
@Override public void trackResponse(CacheStrategy cacheStrategy) {
Cache.this.trackResponse(cacheStrategy);
}
};
Cache.this.put(response); 函数的实现
@Nullable CacheRequest put(Response response) {
....
//最终使用了DiskLru来缓存文件的
Entry entry = new Entry(response);
DiskLruCache.Editor editor = null;
try {
editor = cache.edit(key(response.request().url()));
if (editor == null) {
return null;
}
entry.writeTo(editor);
return new CacheRequestImpl(editor);
} catch (IOException e) {
abortQuietly(editor);
return null;
}
}
当程序继续执行到cacheWritingResponse(cacheRequest, response); 这里又会返回一个新建的Response对象,返回到上一个拦截器
@Override public Response intercept(Chain chain) throws IOException {
...
//TODO 执行下一个拦截器 ,上一个拦截器处理之后的结果,如果当前有设置缓存的化,并且缓存是可以用的化,这里返回的为 cacheWritingResponse 返回的请求结果
Response networkResponse = chain.proceed(requestBuilder.build());
//保存用户的请求头部信息,如果当前有设置Cookie的化
HttpHeaders.receiveHeaders(cookieJar, userRequest.url(), networkResponse.headers());
Response.Builder responseBuilder = networkResponse.newBuilder().request(userRequest);
if (transparentGzip
&& "gzip".equalsIgnoreCase(networkResponse.header("Content-Encoding"))
&& HttpHeaders.hasBody(networkResponse)) {
GzipSource responseBody = new GzipSource(networkResponse.body().source());
Headers strippedHeaders = networkResponse.headers().newBuilder()
.removeAll("Content-Encoding")
.removeAll("Content-Length")
.build();
responseBuilder.headers(strippedHeaders);
String contentType = networkResponse.header("Content-Type");
responseBuilder.body(new RealResponseBody(contentType, -1L, Okio.buffer(responseBody)));
}
return responseBuilder.build();
}
上边在得到上一个拦截器返回的数据之后,这边又根据是否有设置CookieJar来保存请求的头,然后又封装一个Response对象返回给上一个拦截器,最终又返回给我们自定义的拦截器
通过拦截器的时候,我们可以看到我们自定义的拦截器是第一个先执行的,当获取到结果之后,我们的自定义的拦截器是最后一个执行的,每一个拦截器都负责值的内容,各司其职
拦截器的总结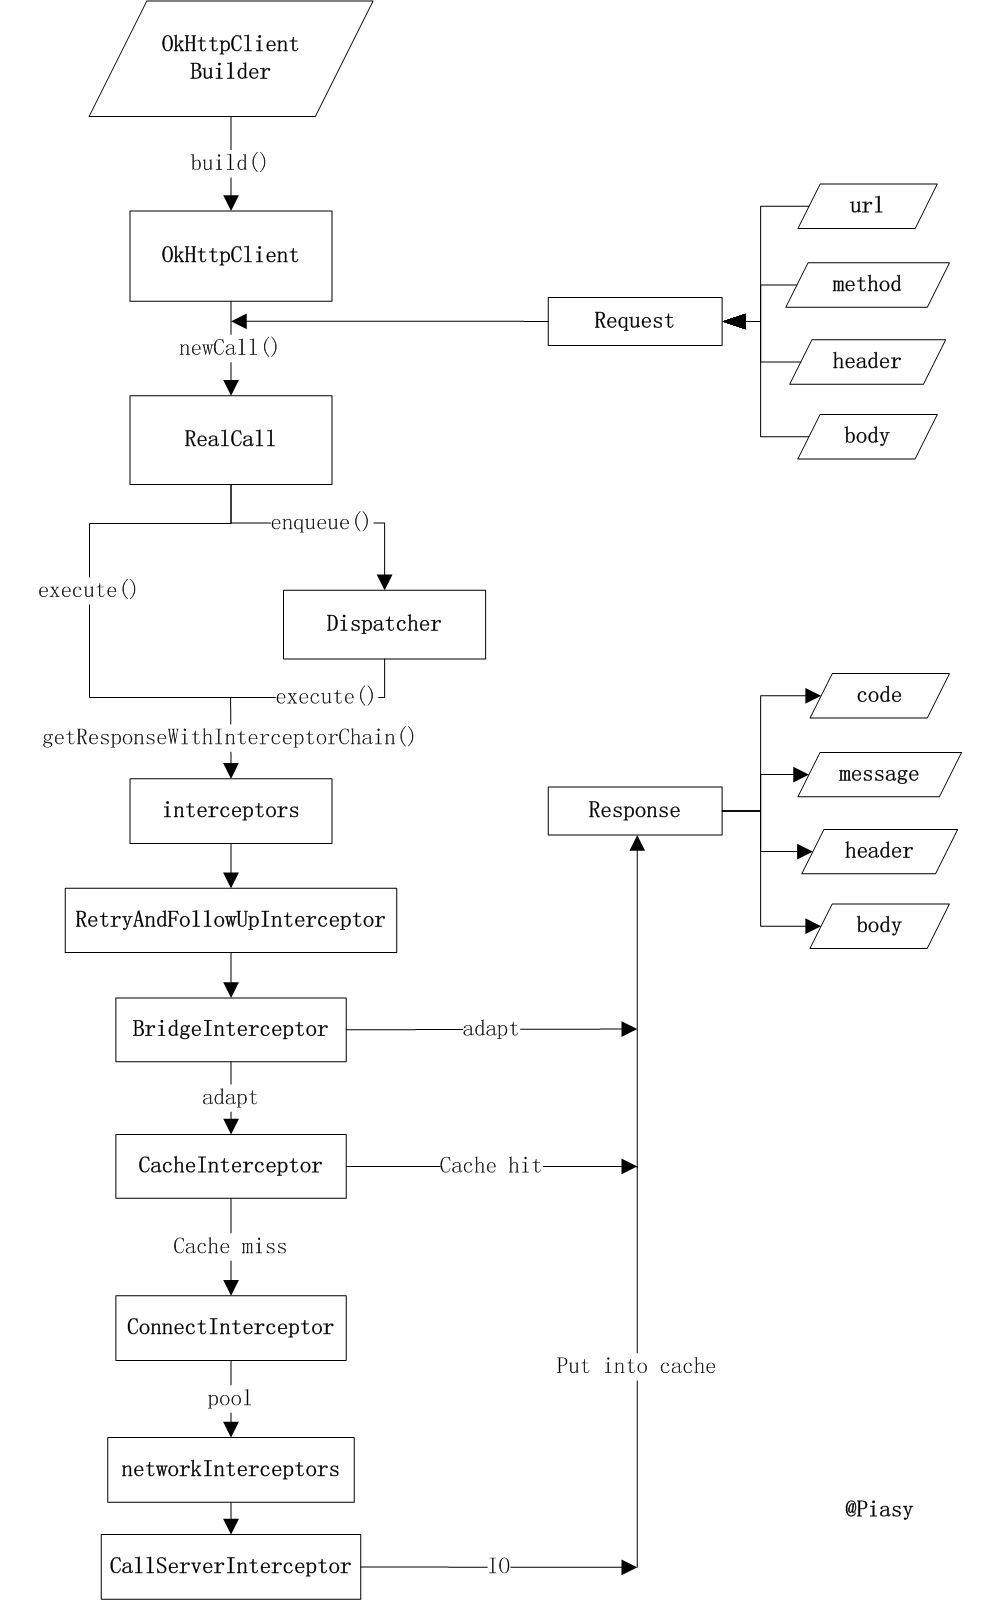
等待队列的执行
前面说过等待的队列什么时候会执行,这里解决这个疑问
try {
      client.dispatcher().executed(this);
      Response result = getResponseWithInterceptorChain();
      if (result == null) throw new IOException("Canceled");
      return result;
    } catch (IOException e) {
      eventListener.callFailed(this, e);
      throw e;
    } finally {
      client.dispatcher().finished(this);
}

当进行请求的时候,不管结果怎么样,最后都会执行到了client.dispatcher().finished(this);
/**
 * Used by {@code Call#execute} to signal completion.
 */
 void finished(RealCall call) {
    finished(runningSyncCalls, call, true);
 }

private <T> void finished(Deque<T> calls, T call, boolean promoteCalls) {
    int runningCallsCount;
    Runnable idleCallback;
    synchronized (this) {
        //TODO 移除队列
        if (!calls.remove(call)) throw new AssertionError("Call wasn't in-flight!");
        //TODO 检查执行 readyAsyncCalls 中的请求
        if (promoteCalls) promoteCalls();
        runningCallsCount = runningCallsCount();
        idleCallback = this.idleCallback;
    }
    //闲置调用
    if (runningCallsCount == 0 && idleCallback != null) {
        idleCallback.run();
    }
}

由于 promoteCalls 为true,所以会执行 promoteCall() ,promoteCall()函数的实现为:
private void promoteCalls() {
        //如果当前正在运行的队列数量还是超过了最大的限制,直接返回
        if (runningAsyncCalls.size() >= maxRequests) return; // Already running max capacity.
        //如果当前等待的队列为空,也直接返回
        if (readyAsyncCalls.isEmpty()) return; // No ready calls to promote.

        //如果到了这里,就说明,正在运行的队列没有达到最大的限制,等待的队列也不为空,下面将等待队列的任务移出添加到运行的队列中
        for (Iterator<AsyncCall> i = readyAsyncCalls.iterator(); i.hasNext(); ) {
            AsyncCall call = i.next();
            //TODO  相同host的请求没有达到最大
            if (runningCallsForHost(call) < maxRequestsPerHost) {
                i.remove();
                runningAsyncCalls.add(call);
                executorService().execute(call);
            }

            if (runningAsyncCalls.size() >= maxRequests) return; // Reached max capacity.
        }
}