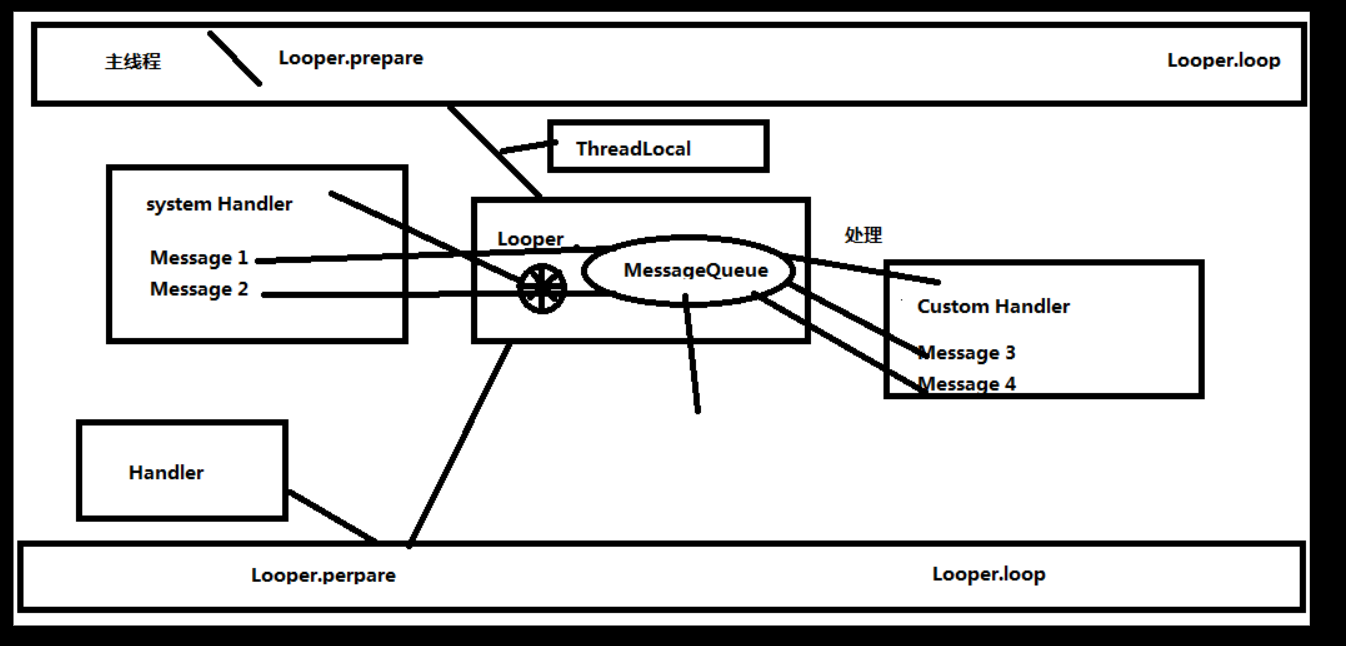
1.系统Handler使用
之前在分析StartActivity ,StartService的时候有分析过,会通过调用Process.start函数创建了一个新的进程,指定新的进程执行android.app.ActivityThread类。,所以也即是每一个应用程序都会对应的有
一个ActivityThread对象,并且在这个对象里面有一个成员变量final H mH = new H();这个H为  private class H extends Handler{....},他即为系统的handler,用来响应四大组件的,这里AcitivityThread
在通过Process.start函数调用的时候,就会执行到main方法
 public static void main(String[] args) {

    .....
    Looper.prepareMainLooper();

    //创建ActivityThread对象
    ActivityThread thread = new ActivityThread();
    thread.attach(false);

    if (sMainThreadHandler == null) {
       sMainThreadHandler = thread.getHandler(); 这里获取到的其实就是H,在 ActivityThread thread = new ActivityThread();创建这个对象的时候,就创建的成员变量
    }

    .....
    // End of event ActivityThreadMain.
    Trace.traceEnd(Trace.TRACE_TAG_ACTIVITY_MANAGER);

    Looper.loop();
 }

先来分析Looper.prepareMainLooper();
/**
* Initialize the current thread as a looper, marking it as an
* application's main looper. The main looper for your application
* is created by the Android environment, so you should never need
* to call this function yourself.  See also: {@link #prepare()}
*/
public static void prepareMainLooper() {
        prepare(false);
        synchronized (Looper.class) {
            if (sMainLooper != null) {
                throw new IllegalStateException("The main Looper has already been prepared.");
            }
            sMainLooper = myLooper();
        }
}
private static void prepare(boolean quitAllowed) {
    if (sThreadLocal.get() != null) {
        throw new RuntimeException("Only one Looper may be created per thread");
    }
    sThreadLocal.set(new Looper(quitAllowed));
}
而sThreadLocal 为  static final ThreadLocal<Looper> sThreadLocal = new ThreadLocal<Looper>();ThreadLocal可以实现线程之间共享内容,其本质为
每一个Thread维护一个ThreadLocalMap,ThreadLocalMap的key是ThreadLocal,而value就是真正要存储的Object。所以每一个Thread中都存有以当前ThreadLocal为key的,而value是存储在当前的Thread
所以可以实现线程间共享,这里假设第一次的执行那么sThreadLocal.get()就会返回null,然后执行sThreadLocal.set(new Looper(false)),为当前的Thread保存以sThreadLocal为key的,value为Looper的对象
new Looper(false)就会创建一个Looper对象
private Looper(boolean quitAllowed) {
    mQueue = new MessageQueue(quitAllowed);//这里又创建MessageQueue对象
    mThread = Thread.currentThread();
}

prepareMainLooper方法继续执行
public static void prepareMainLooper() {
        prepare(false);
        synchronized (Looper.class) {
            if (sMainLooper != null) {sMainLooper 第一次执行,为null
                throw new IllegalStateException("The main Looper has already been prepared.");
            }
            就会执行到这里
            sMainLooper = myLooper();
        }
}

/**
* Return the Looper object associated with the current thread.  Returns
* null if the calling thread is not associated with a Looper.
*/
public static @Nullable Looper myLooper() {
    return sThreadLocal.get();
}
可以看到myLooper()的执行过程也即是获取到当前线程存储的Looper对象,所以prepareMainLooper()的执行过程为判断当前线程是否有设置过以key为sThreadLocal,value为Looper,不允许设置俩次
Looper对象,通一个线程,prepare(false)中的 if (sThreadLocal.get() != null) {throw new RuntimeException("Only one Looper may be created per thread");}可以证明,如果当前线程没有设置
过就准备创建Looper对象,Looper对象里面又会创建MessageQueue对象,而且要注意MessageQueue对象是在Looper对象里面的成员,并不是Handler的成员,同时prePareMainLooper方法中也不允许俩次设置
sMainLooper对象, if (sMainLooper != null) {throw new IllegalStateException("The main Looper has already been prepared.");}可以证明,

这里先分析handler的使用
private static Handler handler = new Handler()
{
        @Override
        public void handleMessage(Message msg)
        {
            super.handleMessage(msg);
        }
};
handler.sendEmptyMessage(0);

先看new Handler()的过程 ,最终会调用到下面的过程,
public Handler(Callback callback, boolean async) {
        if (FIND_POTENTIAL_LEAKS) {
            final Class<? extends Handler> klass = getClass();
            if ((klass.isAnonymousClass() || klass.isMemberClass() || klass.isLocalClass()) &&
                    (klass.getModifiers() & Modifier.STATIC) == 0) {
                Log.w(TAG, "The following Handler class should be static or leaks might occur: " +
                    klass.getCanonicalName());
            }
        }

        //因为这里的Handelr的创建是在主线程里面,这里就获取到当前线程也即是ActivityThread中创建的Looper对象
        mLooper = Looper.myLooper();
        //主线程的Looper是不为空的,在ActivityThread中的prepareMainLooper中就准备好了
        if (mLooper == null) {
            throw new RuntimeException(
                "Can't create handler inside thread that has not called Looper.prepare()");
        }
        //获取到MainLooper中的MessageQueue对象
        mQueue = mLooper.mQueue;
        mCallback = callback;//这里的callback为 public interface Callback {public boolean handleMessage(Message msg);}
        mAsynchronous = async;
}

分析handler.sendEmptyMessage(0);
public final boolean sendEmptyMessage(int what)
{
    return sendEmptyMessageDelayed(what, 0);
}
public final boolean sendEmptyMessageDelayed(int what, long delayMillis) {
    Message msg = Message.obtain();
    msg.what = what;
    return sendMessageDelayed(msg, delayMillis);
}

Message.obtain()函数的实现过程
/**
 * Return a new Message instance from the global pool. Allows us to
 * avoid allocating new objects in many cases.
 */
 Message里面有一个消息池,
private static Message sPool;
private static int sPoolSize = 0;//当前消息池的大小
private static final int MAX_POOL_SIZE = 50;//消息池最大能存多少条消息
public static Message obtain() {
        //首先从消息池中获取到一条消息,如果有就返回
        synchronized (sPoolSync) {
            if (sPool != null) {
                Message m = sPool;
                sPool = m.next;
                m.next = null;
                m.flags = 0; // clear in-use flag
                sPoolSize--;
                return m;
            }
        }
        //如果池里面没有消息,就new一个Message()对象
        return new Message();
}
sendMessageDelayed(msg, delayMillis);
public final boolean sendMessageDelayed(Message msg, long delayMillis)
{
    if (delayMillis < 0) {
        delayMillis = 0;
    }
    return sendMessageAtTime(msg, SystemClock.uptimeMillis() + delayMillis);
}
最终会调用到下面的过程,
private boolean enqueueMessage(MessageQueue queue, Message msg, long uptimeMillis) {
    msg.target = this;//这里的this为当前发消息的handelr对象,也即为我们创建的Handler handler = new Handler() 对象
    if (mAsynchronous) {
        msg.setAsynchronous(true);
    }
    return queue.enqueueMessage(msg, uptimeMillis);
}
会将当前的消息跟当前消息要发送的时间插入到消息队列里面,是要按照时间来排序的,也即是当前msg的when时间,所以就会将消息插入到主线程的mainLooper中常见的MessageQueue对象里面
 boolean enqueueMessage(Message msg, long when) {
    ....
    if (p == null || when == 0 || when < p.when) {//这里的when为0,就会执行到里面
                // New head, wake up the event queue if blocked.
                msg.next = p;
                mMessages = msg;
                needWake = mBlocked;
            } else {
                // Inserted within the middle of the queue.  Usually we don't have to wake
                // up the event queue unless there is a barrier at the head of the queue
                // and the message is the earliest asynchronous message in the queue.
                needWake = mBlocked && p.target == null && msg.isAsynchronous();
                Message prev;
                for (;;) {
                    prev = p;
                    p = p.next;
                    if (p == null || when < p.when) {
                        break;
                    }
                    if (needWake && p.isAsynchronous()) {
                        needWake = false;
                    }
                }
                msg.next = p; // invariant: p == prev.next
                prev.next = msg;
            }

    //这里会返回null,如果 mQuitting为true的话
     // Process the quit message now that all pending messages have been handled.
        if (mQuitting) {
            dispose();
           return null;
        }
    .....
 }

 这里分析怎么停止这个Looper中的无限循环,我们在H handler的HandelrMessage中有这样的实现
  case EXIT_APPLICATION:
  if (mInitialApplication != null) {
            mInitialApplication.onTerminate();
        }
        Looper.myLooper().quit();
  break;

  Looper.myLooper().quit();
  public void quit() {
        mQueue.quit(false);
   }

void quit(boolean safe) {
        if (!mQuitAllowed) {
            throw new IllegalStateException("Main thread not allowed to quit.");
        }

        synchronized (this) {
            if (mQuitting) {
                return;
            }
            mQuitting = true; //这里就会将这个mQuitting设置为true

            if (safe) {
                removeAllFutureMessagesLocked();
            } else {
                removeAllMessagesLocked();
            }

            // We can assume mPtr != 0 because mQuitting was previously false.
            nativeWake(mPtr);
        }
    }


这里解析分析 ActivityThread中的Looper.looper()的执行过程
public static void loop() {
        final Looper me = myLooper();//获取到创建的Looper对象
        if (me == null) {
            throw new RuntimeException("No Looper; Looper.prepare() wasn't called on this thread.");
        }
        final MessageQueue queue = me.mQueue;//前面已经分析过MessageQueue是属于Looper对象的

        // Make sure the identity of this thread is that of the local process,
        // and keep track of what that identity token actually is.
        Binder.clearCallingIdentity();
        final long ident = Binder.clearCallingIdentity();

        //无限的for循环,这个就能保证每一个应用程序的ActivityThread是一直允许的,所以他的全局 H 变量Handelr可以一直的响应四大组件,这个就是根本,因为这里一直在循环判断是否有消息到来
        for (;;) {
            Message msg = queue.next(); // might block 获取到最近要显示的一条msg
            //如果msg返回为null的话,就说明要终止这个loop的无限循环
            if (msg == null) {
                // No message indicates that the message queue is quitting.
                return;
            }
            ....
            try {
                //这里的msg.target 为Handler对象,也即为我们创建的Handelr对象
                msg.target.dispatchMessage(msg);
            } finally {
                if (traceTag != 0) {
                    Trace.traceEnd(traceTag);
                }
            }
            .....
            msg.recycleUnchecked();
        }
}

 msg.target.dispatchMessage(msg);
/**
* Handle system messages here.
*/
public void dispatchMessage(Message msg) {

    if (msg.callback != null) {
            handleCallback(msg);
    } else {
        if (mCallback != null) {
            if (mCallback.handleMessage(msg)) {
                    return;
                }
            }

            //这里因为我们没有设置任何的callback,所以就会执行handlerMessage(msg),也即执行到了我们创建的handelr中的重写的handelrMessage()函数
            handleMessage(msg);
        }
}

这里分析  Message msg = queue.next(); // might block
大致就是从当前的消息队列里面按照实际的排序获取到最近一个要显示的消息msg,然后返回这个msg
Message next() {
        .......
        for (;;) {
            if (nextPollTimeoutMillis != 0) {
                Binder.flushPendingCommands();
            }

            nativePollOnce(ptr, nextPollTimeoutMillis);

            synchronized (this) {
                // Try to retrieve the next message.  Return if found.
                final long now = SystemClock.uptimeMillis();
                Message prevMsg = null;
                Message msg = mMessages;
                if (msg != null && msg.target == null) {
                    // Stalled by a barrier.  Find the next asynchronous message in the queue.
                    do {
                        prevMsg = msg;
                        msg = msg.next;
                    } while (msg != null && !msg.isAsynchronous());
                }
                if (msg != null) {
                    if (now < msg.when) {
                        // Next message is not ready.  Set a timeout to wake up when it is ready.
                        nextPollTimeoutMillis = (int) Math.min(msg.when - now, Integer.MAX_VALUE);
                    } else {
                        // Got a message.
                        mBlocked = false;
                        if (prevMsg != null) {
                            prevMsg.next = msg.next;
                        } else {
                            mMessages = msg.next;
                        }
                        msg.next = null;
                        if (DEBUG) Log.v(TAG, "Returning message: " + msg);
                        msg.markInUse();
                        return msg; // 大致就是从当前的消息队列里面按照实际的排序获取到最近一个要显示的消息msg,然后返回这个msg
                    }
                } else {
                    // No more messages.
                    nextPollTimeoutMillis = -1;
                }
            .....
        }
    }

这里分析这种情况,当我们这样调用的时候
handler.post(new Runnable()
{
    @Override
    public void run()
    {

    }
});
public final boolean post(Runnable r)
{
    return  sendMessageDelayed(getPostMessage(r), 0);
}

private static Message getPostMessage(Runnable r) {
    Message m = Message.obtain();
    m.callback = r;//这里将messge中的callback设置为我们创建的匿名对象Runnable,其他的跟之前的分析一样
    return m;
}

最终也会执行到这里
msg.target.dispatchMessage(msg);
/**
* Handle system messages here.
*/
public void dispatchMessage(Message msg) {
    //因为我们在msg中的callback中有为这个值赋值,所以这个值不为空
    if (msg.callback != null) {
          handleCallback(msg);//所以就会执行到这里
    } else {
        if (mCallback != null) {
            if (mCallback.handleMessage(msg)) {
                    return;
                }
            }
            handleMessage(msg);
        }
}
private static void handleCallback(Message message) {
        message.callback.run();//最终执行了这个callback的run方法,也即回调执行到了我们匿名创建的Runnable中的run方法
}

至于其他的handler.postDelay()的原理都是一样的,都是设置回调

分析下这个,我们可以在Activity中这样写,这相信很多人都有写过
runOnUiThread(new Runnable()
{
            @Override
            public void run()
            {

            }
});
public final void runOnUiThread(Runnable action) {
    if (Thread.currentThread() != mUiThread) {
        //如果当前的线程不是在UI线程里面,就利用mhander.post(action),而mHandler为 Activity中的成员变量,声明为final Handler mHandler = new Handler();,我们上面分析过Handler的创建过程
        //最终也是共享ActivityThread中调用prepareMainLooper()中创建的Loopder对象,跟Looper对象里面创建的MessageQueue对象,最终跟我们正常使用是一样的流程
        mHandler.post(action);
    } else {
        //如果是在主线程,就立刻的执行这个run方法
        action.run();
    }
}
这里总结下系统H Handler的作用,也即是他既可以响应我们的handelr的消息,也可以享用系统的Handler的消息