MVP的定义
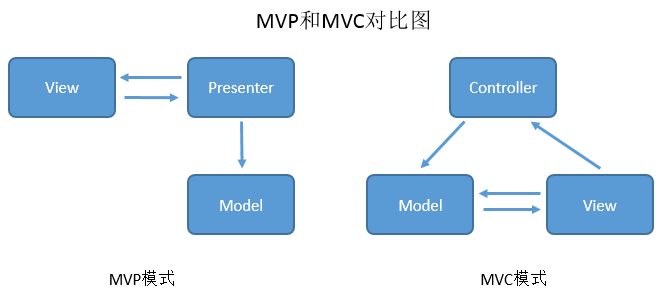
在MVP里,Presenter完全把Model和View进行了分离,主要的程序逻辑在Presenter里实现。
而且,Presenter与具体的View是没有直接关联的,
而是通过定义好的接口进行交互,从而使得在变更View时候可以保持Presenter的不变。
View层显示功能,除此就不应该有更多的内容,绝不容许直接访问Model,这就是与MVC很大的不同之处。
简单的使用
<?xml version="1.0" encoding="utf-8"?>
<android.support.v4.widget.DrawerLayout
    android:id="@+id/drawer"
    xmlns:android="http://schemas.android.com/apk/res/android"
    xmlns:app="http://schemas.android.com/apk/res-auto"
    xmlns:tools="http://schemas.android.com/tools"
    android:layout_width="match_parent"
    android:layout_height="match_parent"
    >

    <TextView
        android:id="@+id/content"
        android:layout_width="match_parent"
        android:layout_height="match_parent"
        android:gravity="center"
        />

    <android.support.design.widget.NavigationView
        android:id="@+id/navigation"
        android:layout_width="wrap_content"
        android:layout_height="match_parent"
        android:layout_gravity="start"
        app:headerLayout="@layout/head" 左侧滑出菜单头部的布局
        app:menu="@menu/view_menu" menu条目的布局
        >
    </android.support.design.widget.NavigationView>
</android.support.v4.widget.DrawerLayout>

layout/head
<LinearLayout xmlns:android="http://schemas.android.com/apk/res/android"
    xmlns:tools="http://schemas.android.com/tools"
    android:orientation="vertical"
    android:layout_width="match_parent"
    android:gravity="center"
    android:layout_height="match_parent">
    <ImageView
        android:id="@+id/ivAvatar"
        android:layout_width="wrap_content"
        android:layout_height="wrap_content"
        android:paddingTop="15dp"
        android:src="@mipmap/ic_account_circle_white_48dp" />

    <TextView
        android:id="@+id/tvNickName"
        android:layout_width="match_parent"
        android:layout_height="wrap_content"
        android:paddingTop="15dp"
        tools:text="JohnTsai"
        android:text="登录"
        android:gravity="center"
        android:textAppearance="@style/TextAppearance.AppCompat.Body1" />

    <TextView
        android:id="@+id/tvRealName"
        android:layout_width="wrap_content"
        android:layout_height="wrap_content"
        tools:text="JohnTsaiAndroid" />
</LinearLayout>

menu/view_menu"
<?xml version="1.0" encoding="utf-8"?>
<menu xmlns:android="http://schemas.android.com/apk/res/android">
    <group>
        <item
            android:id="@+id/nav_me"
            android:title="我"
            android:icon="@mipmap/ic_mine_gray_24"/>
        <item
            android:id="@+id/nav_friend"
            android:title="好友"
            android:icon="@mipmap/ic_friends_gray_24"/>
        <item
            android:id="@+id/nav_notification"
            android:title="通知"
            android:icon="@mipmap/ic_notification_gray_24"/>
        <item
            android:id="@+id/nav_message"
            android:title="私信"
            android:icon="@mipmap/ic_messages_gray_24"
            />
    </group>
<menu>
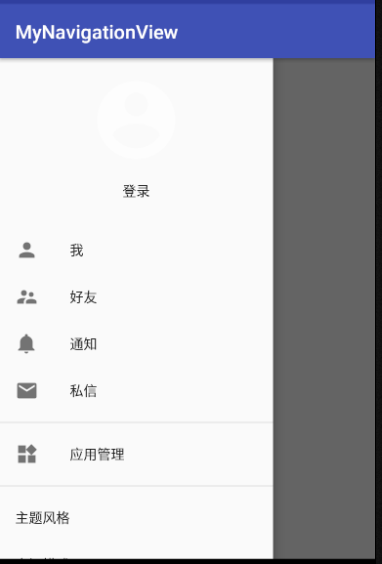
运行结果为

源码分析
public class NavigationView extends ScrimInsetsFrameLayout {
    MVP 中M层的实现
    private final NavigationMenu mMenu;
    MVP 中P层的实现 ,一上来就直接的初始话了一个全局的变量
    private final NavigationMenuPresenter mPresenter = new NavigationMenuPresenter();
    构造函数的执行
    public NavigationView(Context context, AttributeSet attrs, int defStyleAttr) {
        super(context, attrs, defStyleAttr);
        ......
        // Create the menu
        mMenu = new NavigationMenu(context);
        ......
        MVP中,M层持有了P层的引用
        mMenu.addMenuPresenter(mPresenter);
        这边可以推导p层是用来构建视图的
        addView((View) mPresenter.getMenuView(this));

        .....
        这个为我们在使用NavigationView的时候,设置的menu布局文件
        if (a.hasValue(R.styleable.NavigationView_menu)) {
            inflateMenu(a.getResourceId(R.styleable.NavigationView_menu, 0));
        }
        这个为我们在使用NavigationView的时候,设置的headerLayout布局文件
        if (a.hasValue(R.styleable.NavigationView_headerLayout)) {
            inflateHeaderView(a.getResourceId(R.styleable.NavigationView_headerLayout, 0));
        }
    }
}
mPresenter.getMenuView(this));源码体现为
@Override
    public MenuView getMenuView(ViewGroup root) {
        if (mMenuView == null) {
            发现public class NavigationMenuView extends RecyclerView implements MenuView 其实NavigationMenuView就是一个RecycleView
            第三个参数为false,代表当前没有填充进root里面
            mMenuView = (NavigationMenuView) mLayoutInflater.inflate(
                    R.layout.design_navigation_menu, root, false);

            既然上面的本质为RecycleView 所以这个适配器就为RecycleView.Adapter
            private class NavigationMenuAdapter extends RecyclerView.Adapter<ViewHolder>
            if (mAdapter == null) {
                mAdapter = new NavigationMenuAdapter();
            }
            初始话mHeaderLayout ,本质为一个LineLayout
            第三个参数为false,代表当前没有填充进mMenuView里面
            mHeaderLayout = (LinearLayout) mLayoutInflater
                    .inflate(R.layout.design_navigation_item_header,
                            mMenuView, false);
            给RecycleView 配置适配器
            mMenuView.setAdapter(mAdapter);
        }
        return mMenuView;
    }

R.layout.design_navigation_menu 布局文件为
<android.support.design.internal.NavigationMenuView
        xmlns:android="http://schemas.android.com/apk/res/android"
        android:id="@+id/design_navigation_view"
        android:layout_width="match_parent"
        android:layout_height="match_parent"
        android:paddingBottom="@dimen/design_navigation_padding_bottom"
        android:clipToPadding="false"
        android:scrollbars="vertical"/>

R.layout.design_navigation_item_header布局文件为
<LinearLayout xmlns:android="http://schemas.android.com/apk/res/android"
      android:id="@+id/navigation_header_container"
      android:layout_width="match_parent"
      android:layout_height="wrap_content"
      android:orientation="vertical"
      android:paddingBottom="@dimen/design_navigation_separator_vertical_padding" />
首先分析 inflateMenu(a.getResourceId(R.styleable.NavigationView_menu, 0));的实现过程
public void inflateMenu(int resId) {
        mPresenter.setUpdateSuspended(true);
        resId为我们使用的menu布局的id,这边做的事情就是传递mMenu进去,然后解析这个布局文件,将内容设置到mMenu里面,mMenu为我们的M层,用来处理数据的
        getMenuInflater().inflate(resId, mMenu);
        mPresenter.setUpdateSuspended(false);
        上面的数据解析完之后,通知p层来构建视图
        mPresenter.updateMenuView(false);
}
 mPresenter.updateMenuView(false); 源码实现为
@Override
public void updateMenuView(boolean cleared) {
        if (mAdapter != null) {
            mAdapter.update();
        }
}
public void update() {
    填充内容的布局
    prepareMenuItems();
    然后通知刷新界面
    notifyDataSetChanged();
}
 /**
  * Flattens the visible menu items of {@link #mMenu} into {@link #mItems},
  * while inserting separators between items when necessary.
  */
    private void prepareMenuItems() {
        if (mUpdateSuspended) {
            return;
        }
        // private final ArrayList<NavigationMenuItem> mItems = new ArrayList<>(); 为适配器中要构建的item
        mUpdateSuspended = true;
        mItems.clear();
        添加头部的Item
        mItems.add(new NavigationMenuHeaderItem());
          这边就会将mMenu的内容添加到mItems里面
          for (int i = 0, totalSize = mMenu.getVisibleItems().size(); i < totalSize; i++) {
                MenuItemImpl item = mMenu.getVisibleItems().get(i);
        }
}
分析 inflateHeaderView(a.getResourceId(R.styleable.NavigationView_headerLayout, 0));
public View inflateHeaderView(@LayoutRes int res) {
    P层用来构建试图
    return mPresenter.inflateHeaderView(res);
}
mPresenter.inflateHeaderView(res);源码实现为
public View inflateHeaderView(@LayoutRes int res) {
        加载一开始在布局文件里设置的header布局,这里的第三个参数为false,代表没有添加到mHeaderLayout里面
        View view = mLayoutInflater.inflate(res, mHeaderLayout, false);
        addHeaderView(view);
        return view;
}
 public void addHeaderView(@NonNull View view) {
        最终将解析的header布局添加到一开始加载进来的LineLayout里面
        mHeaderLayout.addView(view);
        // The padding on top should be cleared.
        mMenuView.setPadding(0, 0, 0, mMenuView.getPaddingBottom());
}
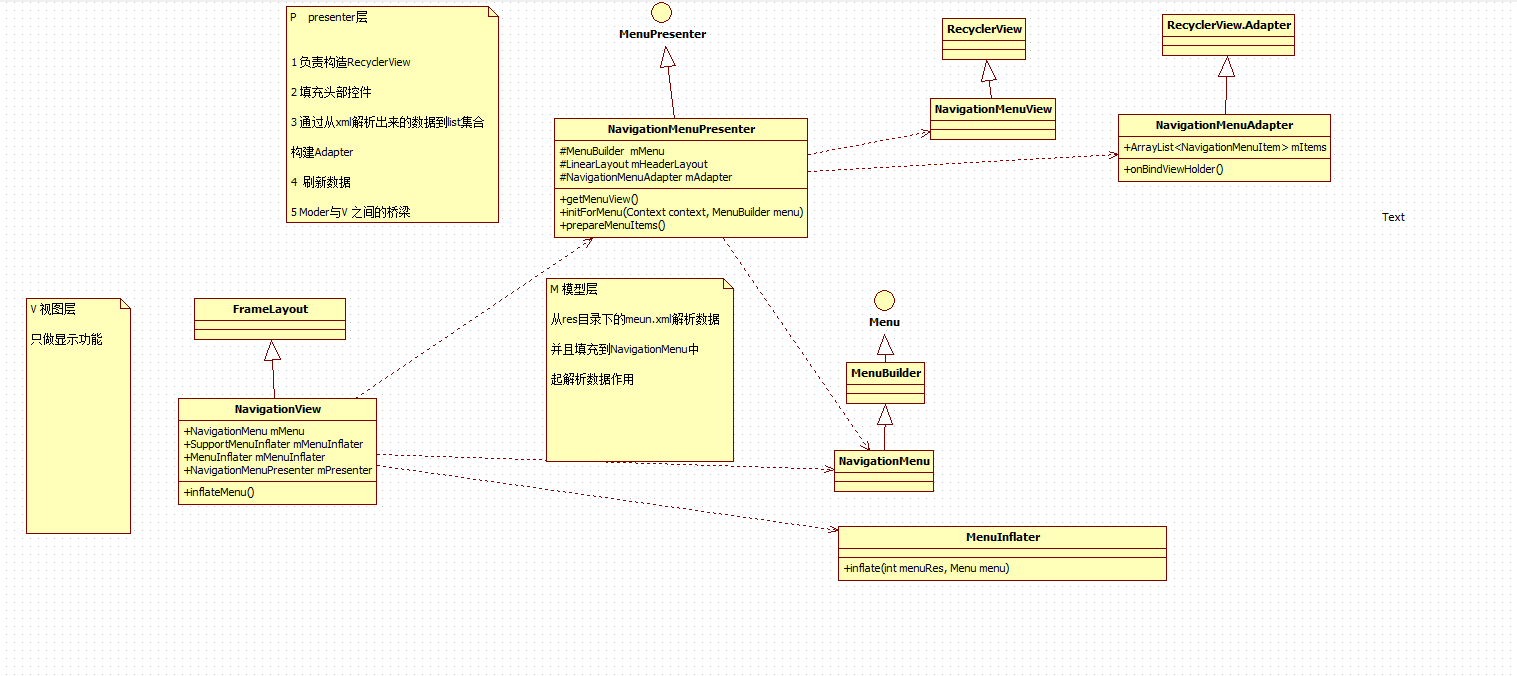
NavigationView类结构图

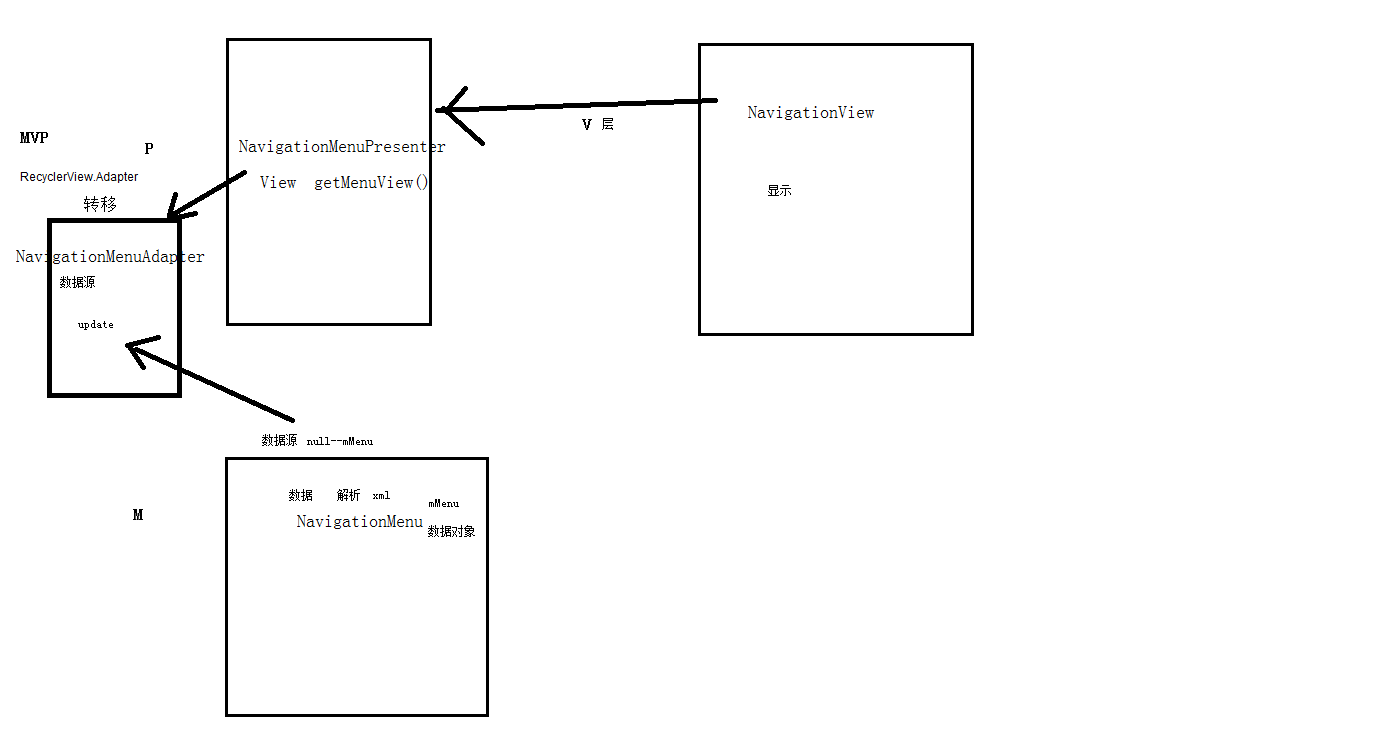
NavagitionView三层模型


